Using the Hyli wallet
On most blockchains, your identity is your wallet address. On Hyli, identity is a flexible set of credentials verified by a smart contract.
On Hyli, any smart contract can function as a verifiable proof of identity. This enables fine-grained access control and varied authentication mechanisms where each app can rely on the most appropriate form of identity verification: OIDC, password-based, and zkPassport are all valid sources of ID that are relevant in different contexts.
For financial applications, this flexibility enables institutions to integrate with existing identity systems (SSO, corporate directories, hardware security modules) while maintaining cryptographic guarantees for transaction signing.
While extremely flexible, identity management on Hyli can create some complexity for users and developers. So we created the Hyli wallet as an identity hub to offer a unified experience with all Hyli apps.
The Hyli Wallet acts as a gateway to onchain identity. It lets users:
- register multiple authentication methods,
- generate app-specific session keys,
- authenticate without exposing private data.
This creates a unified identity layer for seamless interaction across apps on Hyli.
Supported identity sources
Currently, the wallet is compatible with the following identity sources:
- Username and password
Want to use another identity source? Use our identity guide!
User experience with the Hyli wallet
Create a wallet
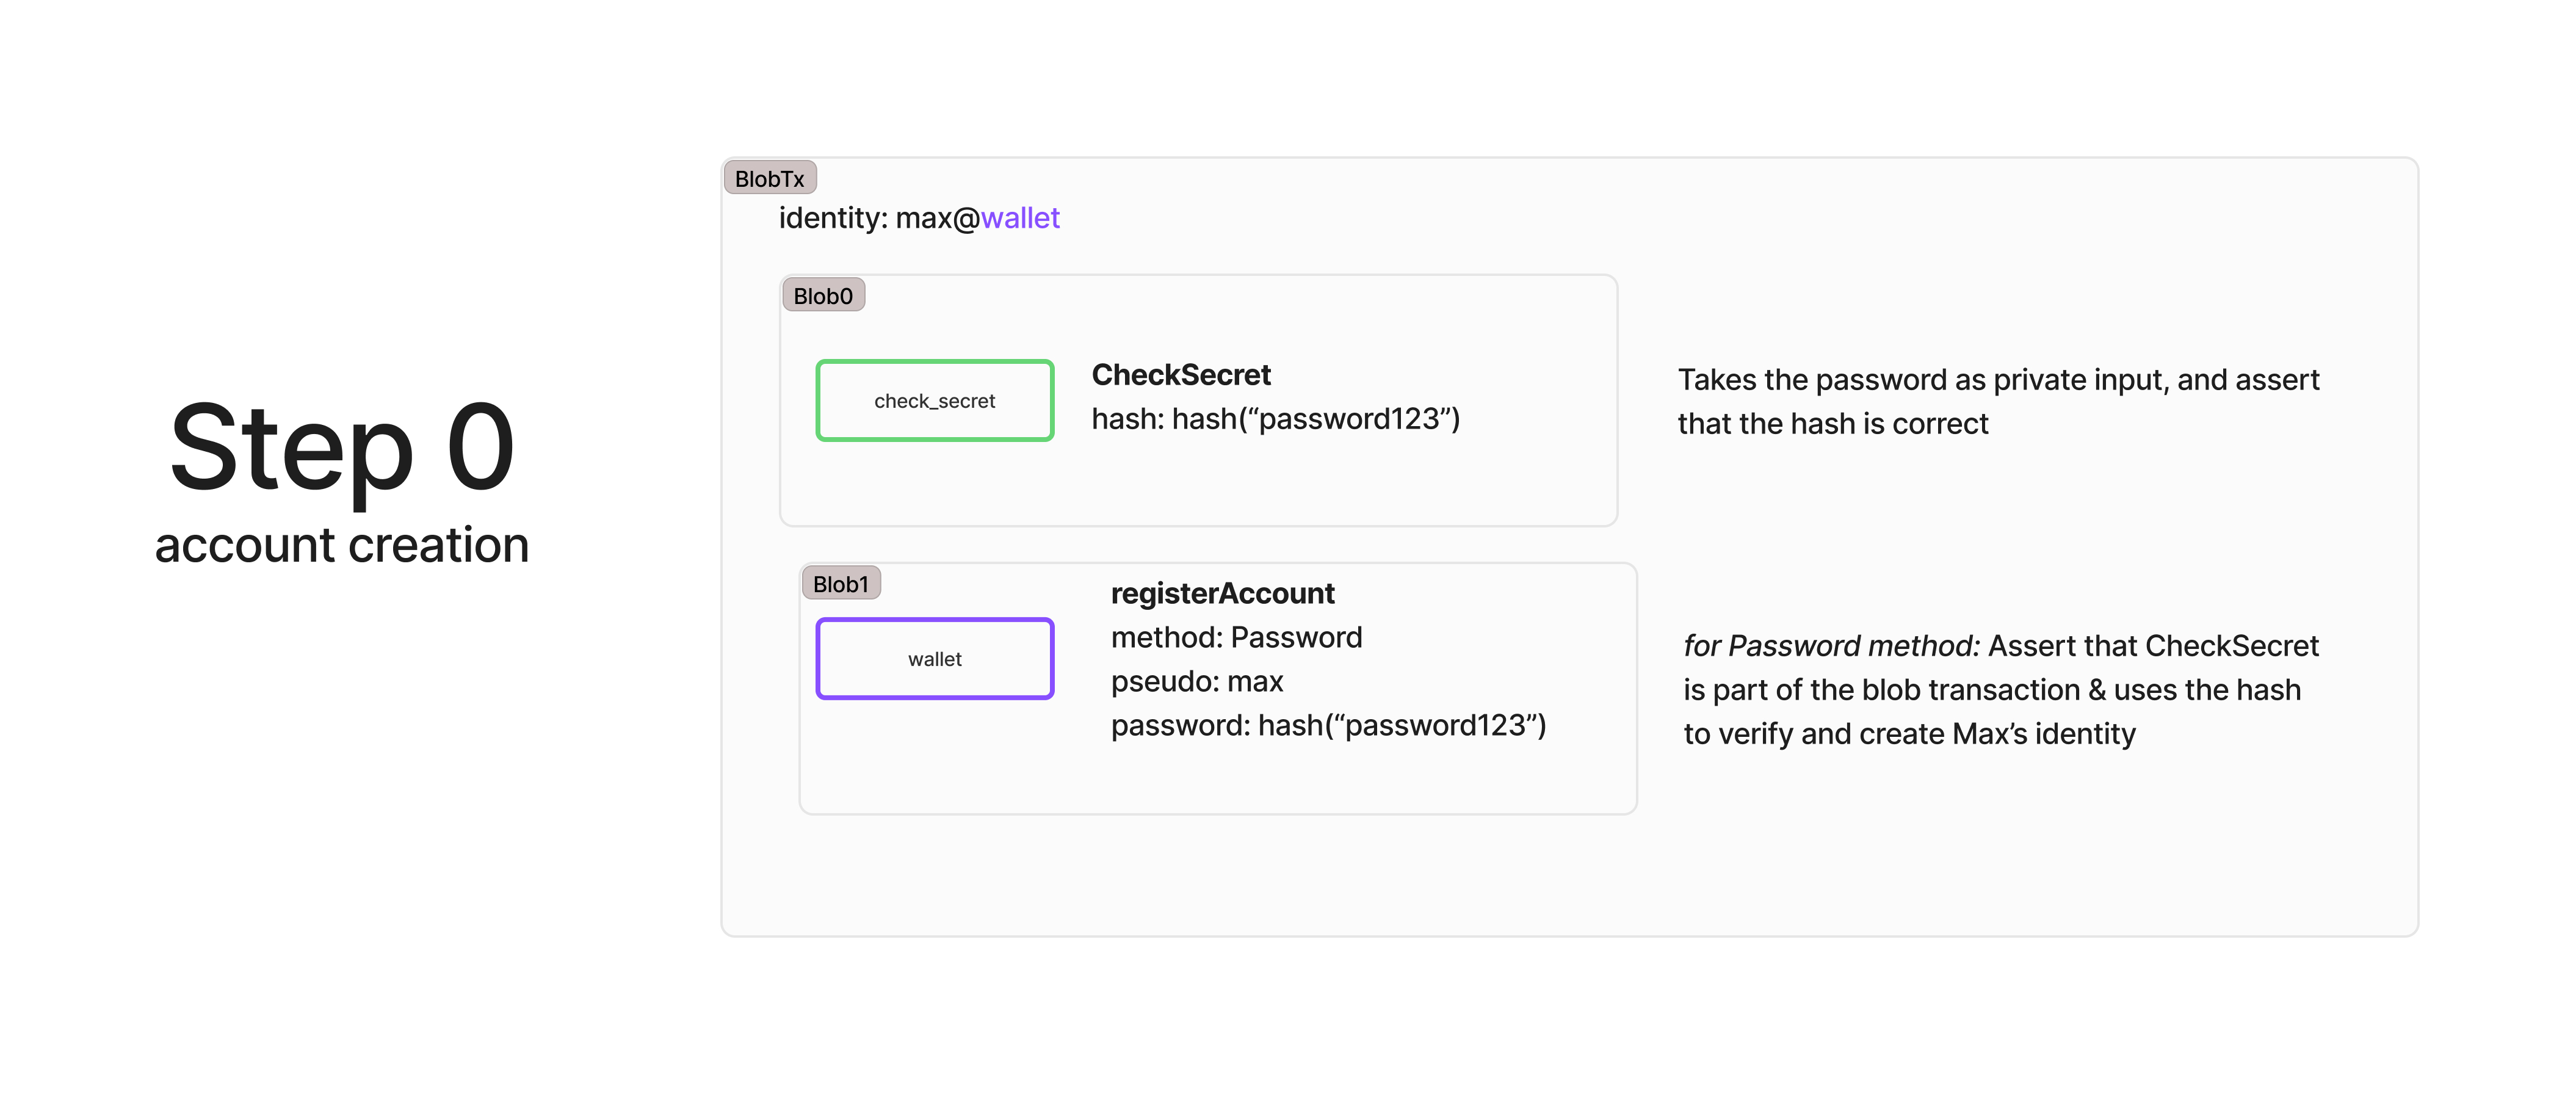
Creating the Hyli wallet is done, as with everything else on Hyli, by sending a transaction. The transaction includes two blobs:
- A
CheckSecretblob takes the user’s password as private input and asserts that the hash is correct; - A
registerAccountblob verifies and stores the user’s Hyli identity,max@wallet, in its state.
The CheckSecret contract is written in Noir; see the source code on GitHub.
Create a session key
The user can create a session key on any app. A session key includes a public key and a private key.
Register the session key
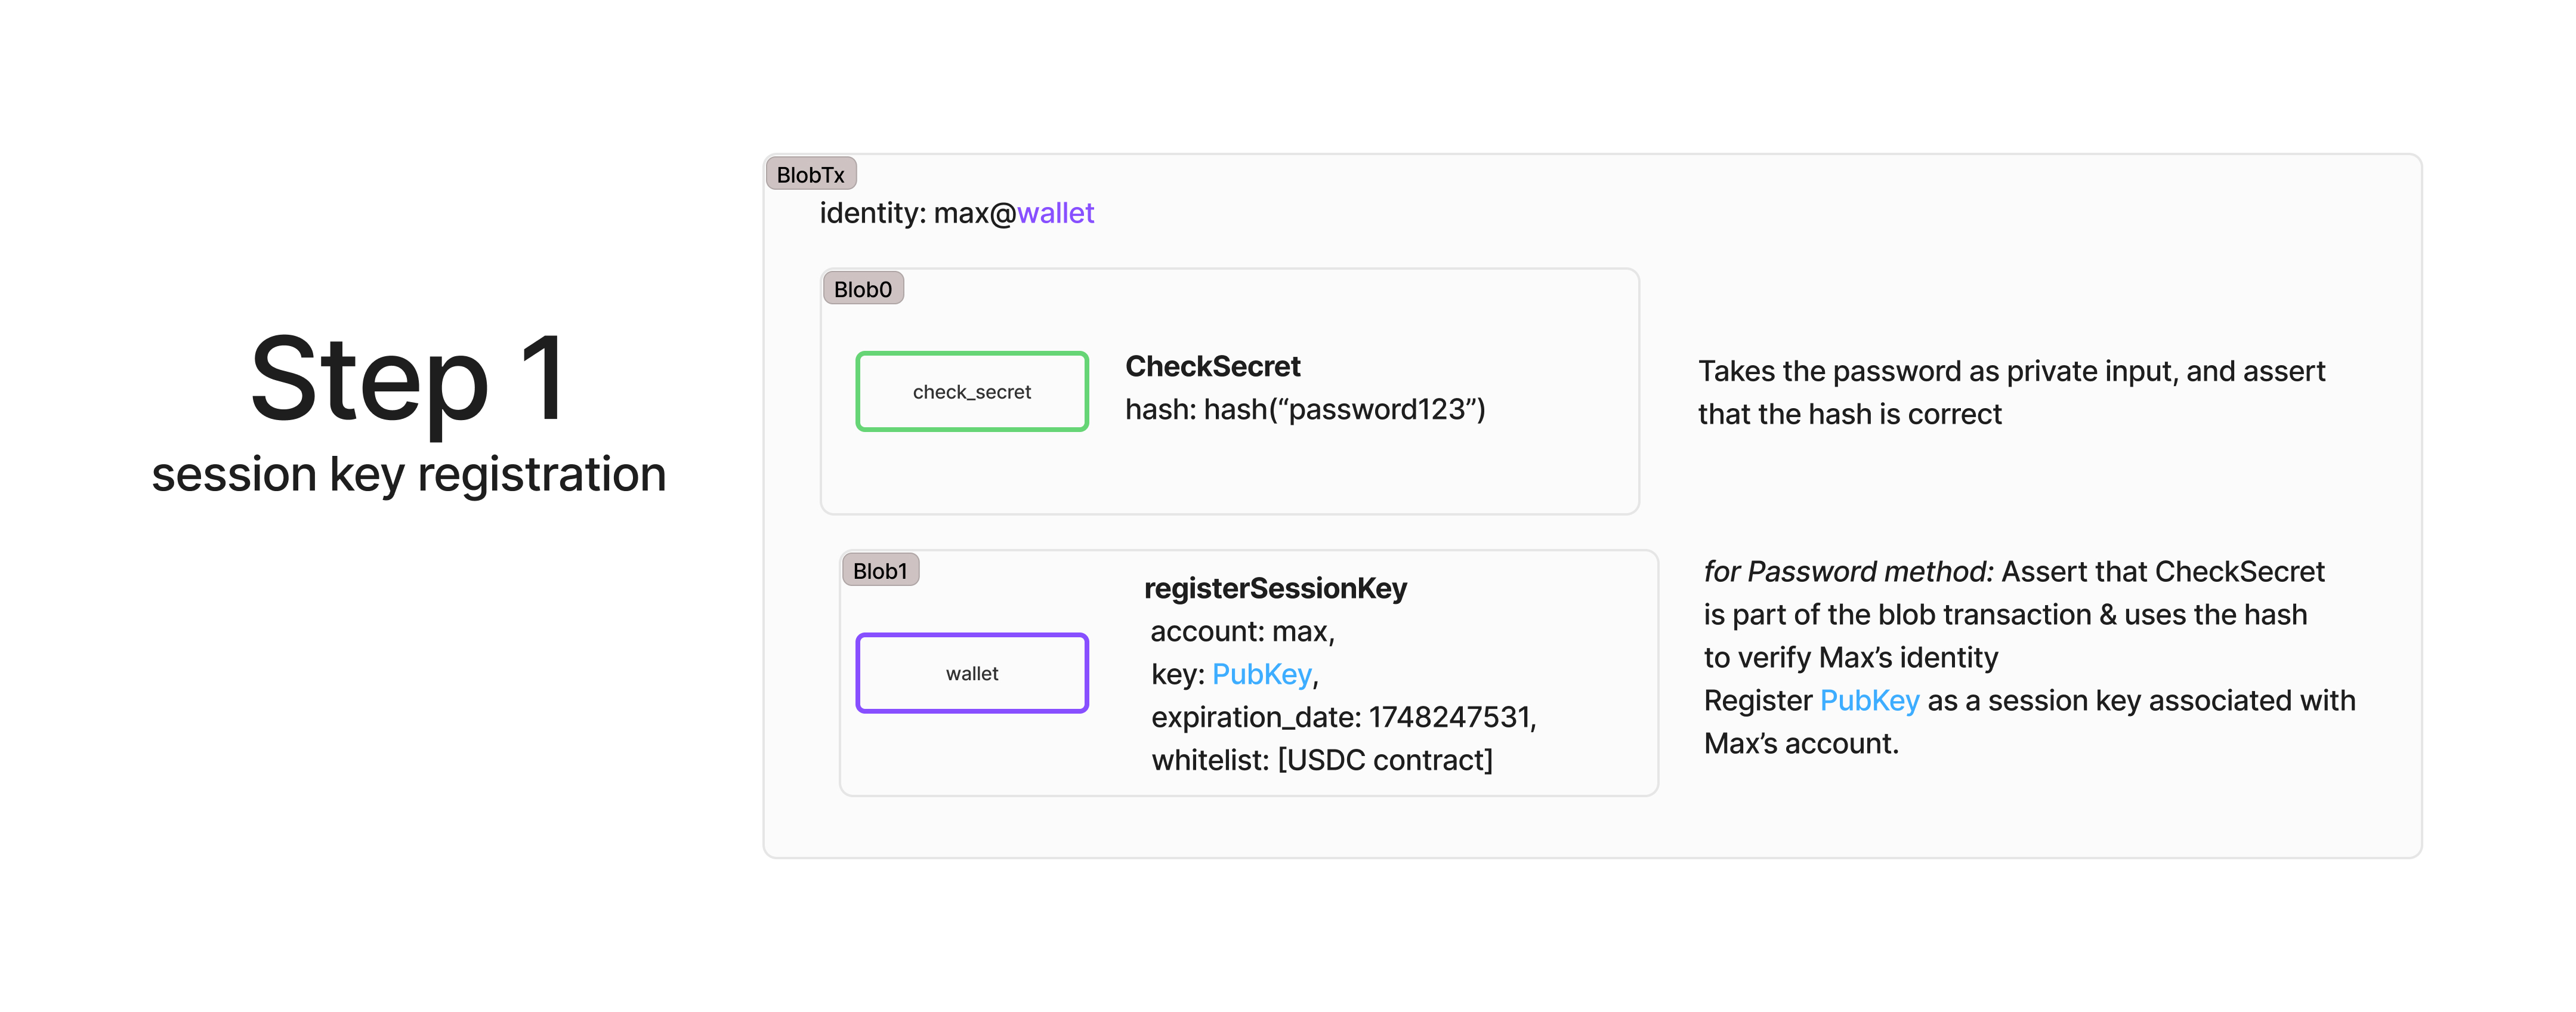
The user registers their session key in a new transaction, which, again, includes two blobs:
- A
CheckSecretblob makes sure that the password is correct, meaning that the user is correctly authenticated; - A
registerSessionKeyblob registers the public key as a session key associated with the user’s account and adds the new contract to the allowlist.
Now, the session key is linked to the user’s wallet. This means that the user can use their wallet to interact with the allowlisted contract.
Use the session key for a future action
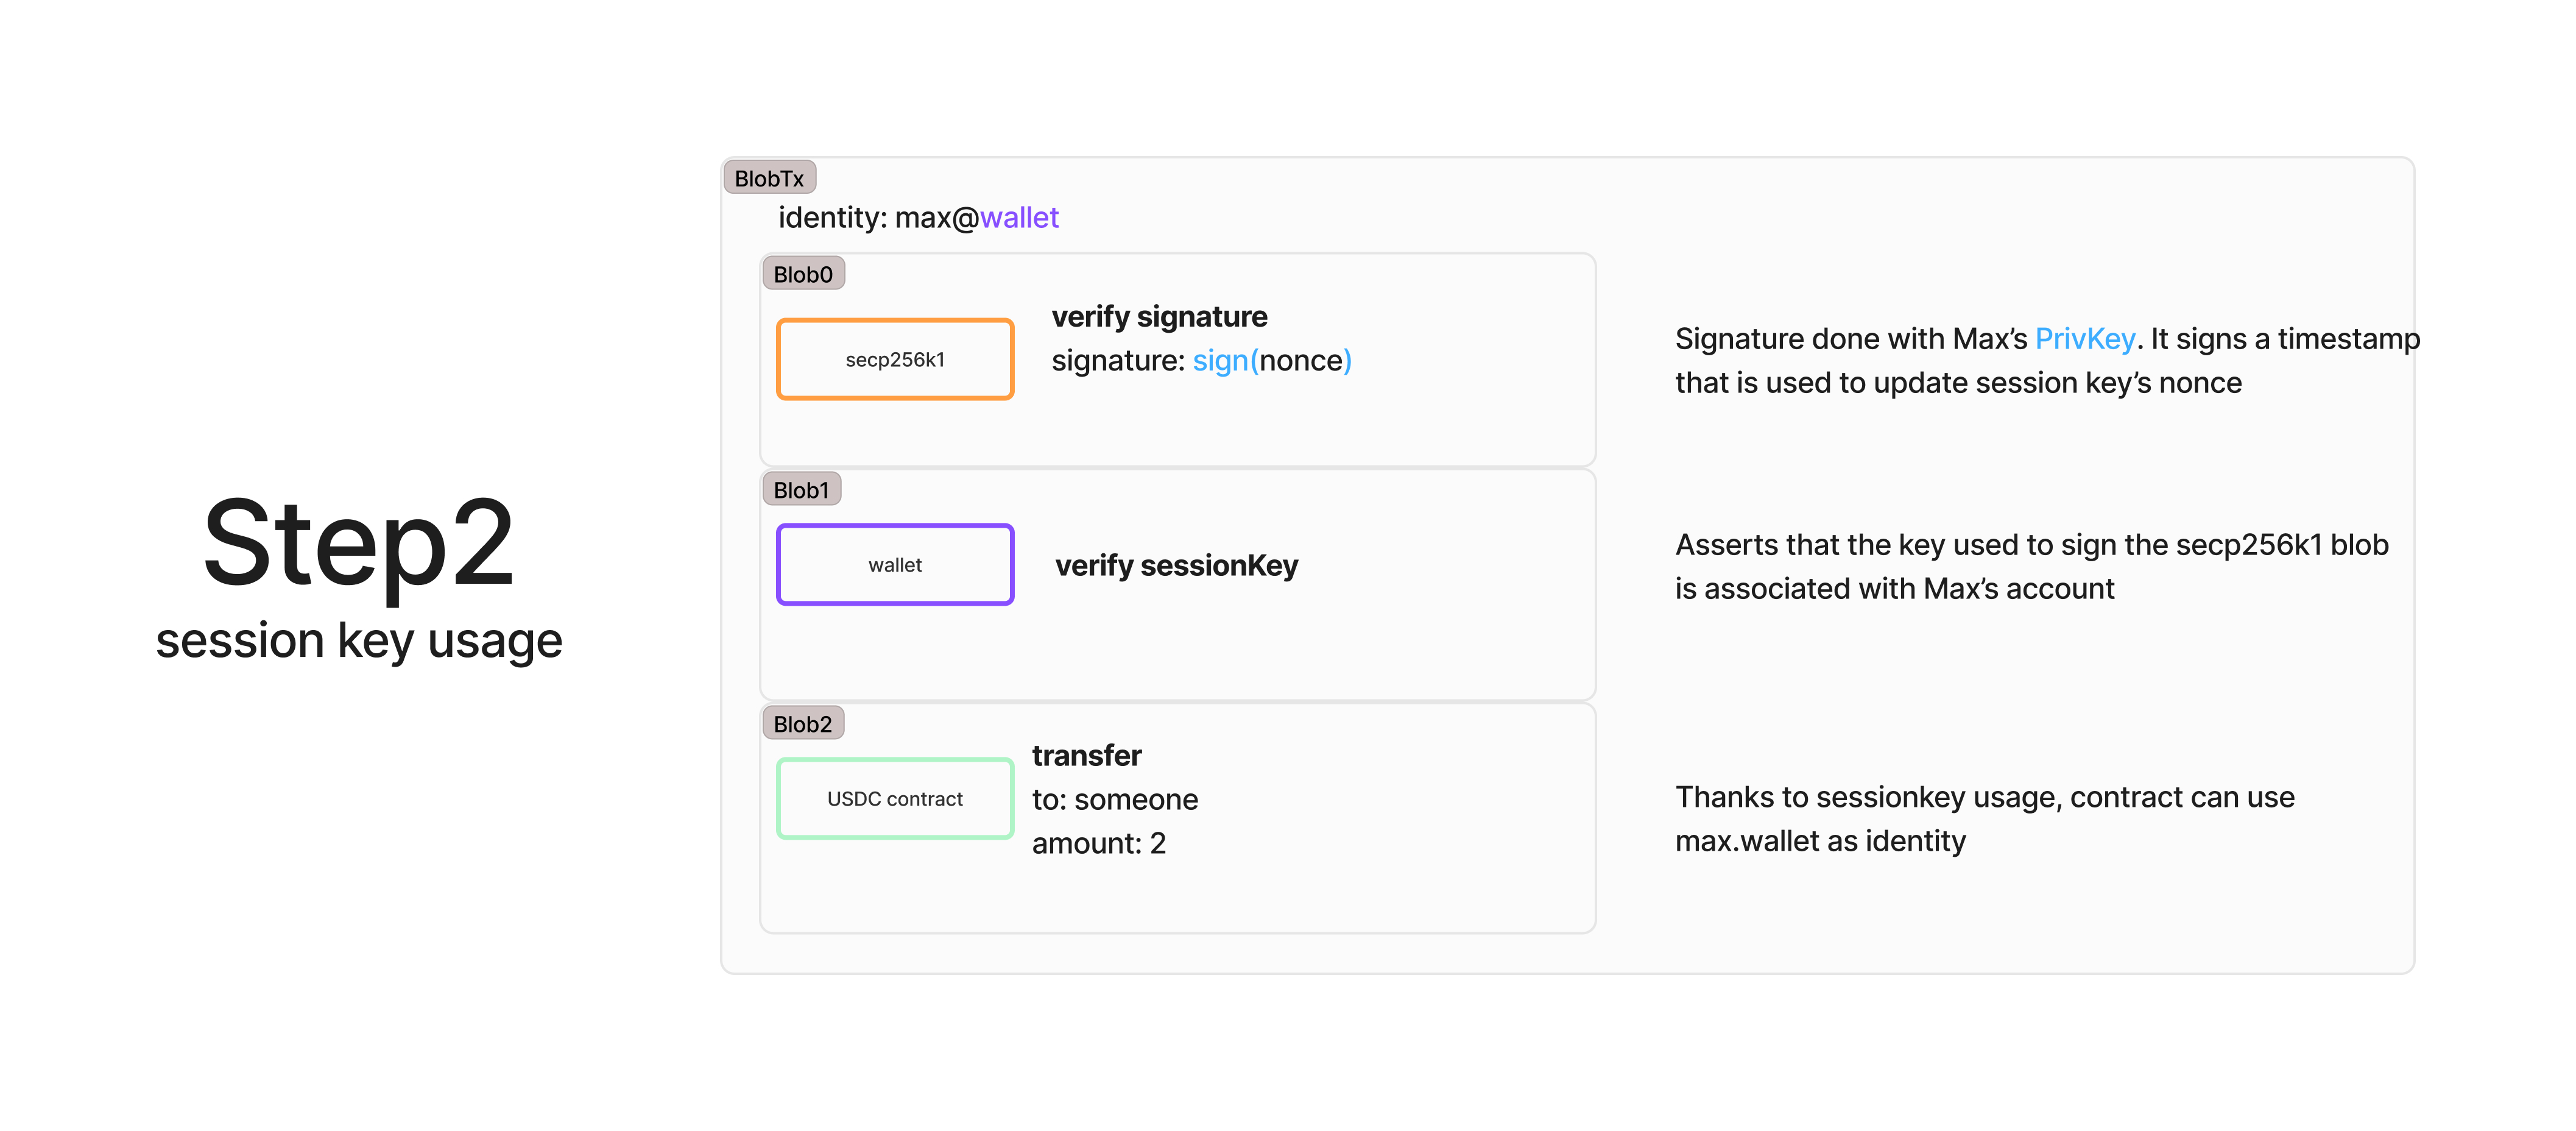
When interacting with the allowlisted contract, the transaction will include three blobs:
- A blob to verify the user’s signature using the private key. The blob signs a timestamp and is used to update the session key’s nonce.
- A blob to verify the session key, asserting that the key used for the signature in the first blob is associated with the user’s account.
- A blob for the transfer itself.
Why use the Hyli wallet?
With this architecture, interacting with a smart contract does not require any private input in the zkVM. The signature is verified natively without requiring the generation of a zero-knowledge proof for this blob.
The two other blobs don’t require authentication, as the authentication blob works for the entire transaction thanks to Hyli’s native proof composition.
This has the added benefit of avoiding timeouts. Since there are no private inputs, anyone can verify every blob in the transaction without worrying too much about privacy, and there is no bottleneck in verification times, as there could be if there were invalid data in a private input. Apps can externalize proving without worrying about security.
Building with the Hyli wallet
Clone the repository
Clone the Hyli wallet repository.
Install
Note the following peer dependencies:
{
    "hyli-check-secret": "^0.3.2",
    "react": "^19.1.0",
    "react-dom": "^19.1.0",
    "react-router-dom": "^7.5.0"
}
Basic Usage
Wrap your application
First, wrap your application with the WalletProvider:
import { WalletProvider } from "hyli-wallet";

function App() {
    return (
        <WalletProvider
            config={{
                nodeBaseUrl: "NODE_BASE_URL",
                walletServerBaseUrl: "WALLET_SERVER_URL",
                applicationWsUrl: "WEBSOCKET_URL",
            }}
            // Optional: session key config
            sessionKeyConfig={{
                duration: 24 * 60 * 60 * 1000, // Session key duration in ms (default: 72h)
                whitelist: [], // Required: contracts allowed for session key
            }}
            // Optional: global wallet event handler
            onWalletEvent={(event) => {
                console.log("Wallet event:", event);
            }}
            // Optional: global wallet error handler
            onError={(error) => {
                console.error("Wallet error:", error);
            }}
        >
            <YourApp />
        </WalletProvider>
    );
}
Use the wallet component
import { HyliWallet } from "hyli-wallet";

function YourComponent() {
    return (
        <HyliWallet
            providers={["password", "google", "github"]} // Optional: specify auth providers
        />
    );
}
Use the Wallet Hook
The useWallet hook provides access to wallet functionality.
import { useWallet } from "hyli-wallet";

function WalletFeatures() {
    const {
        wallet, // Current wallet state
        isLoading,
        error,
        login, // Login function
        registerAccount, // Create new account
        logout, // Logout function
        registerSessionKey, // Create new session key
        removeSessionKey, // Remove existing session key
        signMessageWithSessionKey, // Sign a message with the current session key
    } = useWallet();

    return (
        <div>
            {wallet ? (
                <div>
                    <p>Welcome, {wallet.username}</p>
                    <p>Balance: {balance} HYLLAR</p>
                    <button onClick={logout}>Logout</button>
                </div>
            ) : (
                <p>Please connect your wallet</p>
            )}
        </div>
    );
}
Session key management
Find a full implementation of session keys in SessionKeys.tsx.
Creating a session key
Session keys allow for delegated transaction signing. Here's how to create one:
import { useWallet } from 'hyli-wallet';

const { wallet, registerSessionKey } = useWallet();

// Create a session key that expires in 7 days
const expiration = Date.now() + (7 * 24 * 60 * 60 * 1000);

const { sessionKey } = await registerSessionKey(
  'your_password',
  expiration,
  ['hyllar'] // contracts whitelist
  (txHash: string, type: string) => {
     if (type === 'blob') {
       console.log('Verifying identity...');
       console.log("transaction hash: ", txHash);
     } else if (type === 'proof') {
       console.log('Proof sent, waiting for confirmation...');
       console.log("transaction hash: ", txHash);
     }
   }
);

// The sessionKey object contains:
console.log(sessionKey.publicKey);  // The public key to identify the session
console.log(sessionKey.privateKey); // The private key to sign transactions
// Note that this session key will also be stored in the wallet object
Signing a transaction with a session key
Once you have a session key, you can use it to send transactions.
import { useWallet } from "hyli-wallet";
import { nodeService } from "your-services";

const { wallet, createIdentityBlobs } = useWallet();

// Create identity blobs using the latest created session key, stored in  `wallet` object
const [blob0, blob1] = createIdentityBlobs();

// Create and send the transaction
const blobTx = {
    identity: wallet.address,
    blobs: [blob0, blob1],
};
// blob0 is the secp256k1 blob containing the signature done with the wallet's session keu
// blob1 is the hyli-wallet contract that verifies that the session key is valid

const txHash = await nodeService.client.sendBlobTx(blobTx);
console.log("Transaction sent:", txHash);
Removing a session key
When a session key is no longer needed, you can remove it:
import { useWallet } from "hyli-wallet";

const { removeSessionKey } = useWallet();

// Remove the session key using the wallet password
await removeSessionKey("your_password", "session_key_public_key");
Signing arbitrary messages with a session key
You can sign any message using the current session key.
import { useWallet } from "hyli-wallet";

const { signMessageWithSessionKey } = useWallet();

const message = "Hello, Hyli!";
const { hash, signature } = signMessageWithSessionKey(message);

console.log("Message hash (Uint8Array):", hash);
console.log("Signature (Uint8Array):", signature);
signMessageWithSessionKey(message: string)will throw if there is no session key in the wallet.- The raw hash and signature return as
Uint8Array.
Customizing the user interface
You can customize the connect button by providing a render prop: